
In the previous part, we successfully applied the Blowfish theme and launched the local server. However, what you see on the screen is still just the basic default setup.
In this post, I will introduce how to customize your blog to your liking. While I am also in the process of testing and applying these settings one by one, I will cover the fundamental configuration methods.
1. Understanding the Configuration File Structure#
Most Hugo themes manage the majority of their settings within a single hugo.toml file. However, Blowfish splits these configurations into multiple files for better maintainability.
If you navigate to the config/_default/ folder, you will see the following files:
- hugo.toml: Basic site information (URL, Title, Theme designation).
- languages.toml: Language-specific settings (Korean, English, etc.).
- menus.toml: Configuration for the Header and Footer menus.
- params.toml: General theme settings, including design, profiles, and feature toggles.
We will modify these four files step by step.
2. Setting the Language to Korean#
First, let’s change the default language of the blog to Korean.
① Modify hugo.toml#
Change the defaultContentLanguage value from en to ko.
# config/_default/hugo.toml
theme = "blowfish"
baseURL = "[https://goodjinc.com](https://goodjinc.com)"
defaultContentLanguage = "ko"
② Modify languages.toml#
Since Blowfish supports multi-language setups, you need specific configurations for each language. Rename the existing languages.toml file to languages.ko.toml and edit the content.
As I plan to support both Korean and English, I will create two files: languages.ko.toml and languages.en.toml.
For detailed information on language codes, please refer to the Blowfish Official Documentation.
# config/_default/languages.ko.toml

languageCode = "ko"
languageName = "Korean"
weight = 10
title = "GOODJINC"

[params]
  displayName = "Korean"
  isoCode = "ko"
# config/_default/languages.en.toml

languageCode = "en"
languageName = "EN"
weight = 20
title = "GOODJINC"

[params]
  displayName = "English"
  isoCode = "en"
The displayName allows you to set the name displayed in the language list, and the weight value determines the display order.

3. Profile and Design Settings#
Now, let’s customize the profile picture and introduction text that appear on the main screen. These settings are managed in params.toml.
① Color Schemes#
Blowfish offers various color themes such as blowfish, congo, and github. You can set this in the params.toml file.
Check the Blowfish Official Manual to preview and choose the theme that suits your taste.
# config/_default/params.toml

colorScheme = "github"
② Homepage Configuration#
Find the [homepage] section in the params.toml file and modify it as follows:
# config/_default/params.toml

[homepage]
  layout = "profile" # Recommended: "hero" (with background image) or "profile" (simple)
  showRecent = true # Set to true to display recent posts
I have configured it so that the author’s profile and latest posts are visible first.
③ Author Profile Settings#
If the author’s profile image is not set, the layout may not appear as intended.
First, create an assets/img/ folder and add an image file named author.jpg. Then, configure the author information in languages.ko.toml as follows:
You can also provide different author details for the English version by editing languages.en.toml.
[params.author]
  name = "GOODJINC" # Author Name
  email = "hello@goodjinc.com" # Author Email
  image = "img/author.jpg" # Author Profile Image
  headline = "From the 1% of you" # Headline displayed on the Homepage
  bio = "From the 1% of you" # Short bio displayed within posts
  links = [
    { email = "mailto:hello@goodjinc.com" },
    { github = "https://github.com/goodjinc" },
  ]
The profile set here is used in various places, including the homepage and the author section inside posts, so take some time to craft it carefully.
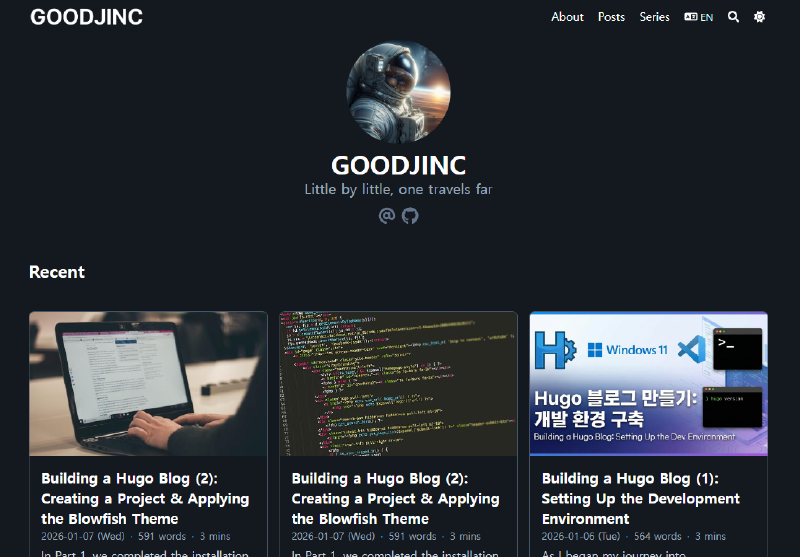
4. Configuring Menus#
Let’s add items to the Header menu bar. Edit the menus.ko.toml file as follows:
You can also configure menus.en.toml to have a different menu structure for the English version.
# config/_default/menus.ko.toml

[[main]]
  name = "About"
  pageRef = "about" # Requires content/about/index.md to be created
  weight = 10

[[main]]
  name = "Posts"
  pageRef = "posts" # Links to the content/posts folder
  weight = 20

[[main]]
  name = "Series"
  pageRef = "series"
weight = 30- weight: Smaller numbers are placed further to the left.
- pageRef: The path to the content you want to link.
If you want to add a menu to the bottom of the website, add the following code to menus.ko.toml:
# config/_default/menus.ko.toml

[[footer]]
  name = "Tags"
  pageRef = "tags"
  weight = 10

[[footer]]
  name = "Categories"
  pageRef = "categories"
  weight = 20
5. Verifying the Results#
Once you have finished all modifications, run the server by typing hugo server in your terminal.
If the server was already running, the changes should reflect automatically. If an ERROR occurs, try restarting the server.
Check the main page to ensure all modified parts are correctly reflected. Since we haven’t written any posts yet, some menus or content sections might appear empty.
6. Closing#
The aesthetic part of the blog is now mostly complete. In the next part, we will move on to the most important aspect: Writing Content.